Pages

Sunday, August 14, 2011

The "Monumental Success" Shirt

Pattern: Cynthia Rowley for Simplicity 2215, View D
Fabric: Navy blue and white gingham
Notions: Lightweight interfacing, navy thread, and six flower buttons from The Finishing School
Time to Complete: Longer than it should have!
First Worn: Sunday, August 14, 2011
Wear Again? Yes
Total Cost: ~$10

I chose this pattern to sew for my intermediate sewing class at The Finishing School. My instructor told us (one other gal in the class) to choose a pattern that we could make over and over slightly varying the pattern each time we make it. I thought that I could make the shirt and skirt over and over again but the dress was probably a one time thing just because you can't really make the same dress twice, now can you? Anyway, the last three to four weeks of the class I made this shirt includinig a muslin. I'm really sad that I didn't take a picture of the pinned and final muslin but I would have looked like a total nerd in the class. One draw back about the class is that I didn't have time to take notes! We made a lot of sample items and for a bunch of them I wish I had a step by step example (e.g., lapped zipper). I only sewed this shirt in class so it took me three to four weeks to finish it from muslin to final garment which I guess isn't that bad and probably came to 6-8 hours from start to finish. Terence calls this shirt a "monumental success" and I think he finally thinks that the class was worth it.


I've been waiting to make other garments until after the class becuase of the fitting exercise. It was a whirlwind and the instructor did it all so it may will take some time for me to master all by myself. Muslins are now a must for every new pattern until I get to know the usual suspects for my body. It will be hard doing it do myself which is why a dress form is pretty handy. I guess I'll have to add it to my Christmas/birthday wish list.


I learned to: make and alter a muslin; use the muslin as the master pattern for the final piece; alter, sew and apply a colar, alter and sew darts, adjust the facing at the colar; and place and sew buttonholes and buttons. You may not think some of these things are huge but they all add up and can make something look "homecky becky" or professional. I think that this shirt looks pretty professional when compared to the Frumpy Shirt I made a while ago. Don't think I'll be wearing that thing again and if do it will be under a sweater or cardigan like I wore it the first time!

Saturday, June 11, 2011

The "Does This Make Me Look Frumpy?" Shirt


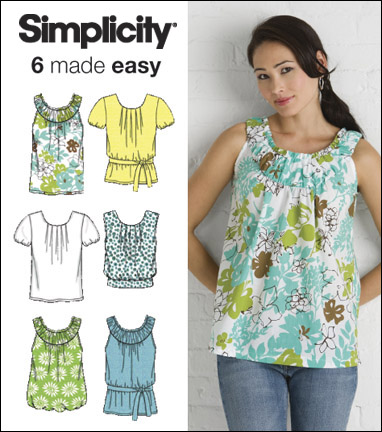
Pattern: Simplicity 2892, View D
Fabric: 100% quilting cotton, buttery-yellow print with orange and pink flowers
Notions: Orange thread
Time to Complete: ~4 hours
First Worn: At work on June 9, 2011
Wear Again? Yes
Total Cost: ~$5

I've had this pattern in my stash for a while and have been meaning to make it up for ages. After my teacher appreciation quilts I kind of needed something quick and easy to sew to get me back in the groove. I have a bunch of quilting cotton for some reason and I picked a print that I thought would look cute with this pattern and was similar to the pattern front photo. Note - I'm really bad at visualizing what fabrics to use with a pattern and what the final result will look like so I tend to mimic the front cover photo look. I need to get out of this rut. I think looking at Flickr and pattern reviews beforehand will help me a lot.


I think cutting the pattern pieces and fabric took the longest percentage of time. I bet I spent 1.5-2 hours! Cutting the pattern pieces and the fabric out is my least favorite part about sewing. I wish I could hire someone to cut all my patterns - any takers? Side tangent (but will come around shortly) - I have a mound of ironing, OK, it is more like a mountain than a mound, and therefore have no clothes in my closet to wear. So I thought that instead of ironing I would "whip" up a shirt and wear it the next day. What was I thinking? It got me sewing again so I guess I shouldn't complain. But, I know what you're saying - where is the logic?! Why doesn't she just iron, for hell's sake?!


Based on my measurements I cut a size 14 out. I should have read the pattern reviews on this one because I should have cut a size 12. I ended taking in the side seems about 2 inches on both sides (and will probably take in more before I wear it again) and reducing the armholes. I asked Terence if the shirt made me look frumpy and instead of being smart he told me I looked like a "frumpenator" and a "frumpster" and any other word you could substitute frumpy for. But he said since I made it he loved it - he tried to win points but miserably failed!

I think if I take in the sides a bit more and only wear it with fitted pants and skirts it will look good. Unfortunately, I think it looks homemade and the front yoke is a bit loose so when I bend over I flash the whole world. But I guess since it is homemade, that isn't such a bad thing. On the other hand, if you are a good seamstress, the garments you make should look store-bought. Since I’m just starting, I'll give myself a little slack.

Monday, April 25, 2011

The "Maiden Voyage" Dress

Summary based on a format from The Sew Weekly.

Photo
Fabric: Blackish-grey Sew Classic 100% Linen and black Ambiance Lining; Joanns
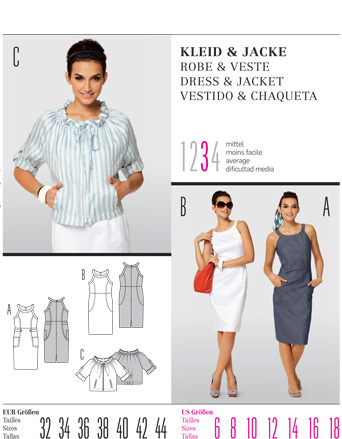
Pattern: Burda 7493, View B
Year: 01/2010
Notions: 22" black invisible zipper, hook and eye closure
Time to Complete: ~18 hours
First Worn: Easter 2011
Wear Again? Yes, maybe with a belt
Total Cost: Who knows, maybe $20 (not including the $120 for the sewing class)

I went on a pattern binge at Joanns recently and bought something like 20 patterns - all for myself. I thought that a sewing class would give me a jump start on my new stash and calm my recent infatuation with sewing blogs. I picked out this Burda pattern thinking that it would be a good pattern to learn some basic skills. I signed up for a class at The Finishing School here in SLC and sadly only have one class left! I've signed up for the intermediate sewing class but am still waiting to see if it will be held (requires five students for the instructor to hold the class). Five classes later and I have a pretty nice dress made by me!


I learned several skills (the right way to do them) while making this dress including: resizing a pattern (including lengthening the torso and using two different sizes - one for the bust and one for the hips), how to install an invisible zipper, how to measure the hemline from the floor, how to hem using my machine's hem stitch, and how to put in a lining without a pattern. All in all I think the $120 for the class was worth every penny.


The dress has a ton of curves and princess darts which I had to fiddle with quite a bit to get them to lay flat. There are a lot of seams in this dress which helps line all of the pieces together but also means that my cutting and sewing had to be precise (learned this after the fact!). Sewing with black fabric and black thread was a pain in the butt when unpicking - which I always seem to do a ton of ;-)


My instructor said that she didn't like Burda patterns because they were hard to follow but I think they were great and could have probably completed this dress without the class - never mind that the zipper wouldn't have been invisible and the hem would have had a solid black stitch through it, etc. If I had to do it all over again I would finish all of the seams (didn't do it because they are hidden by the lining). I think it would help with making everything lay flat.


Mental notes - don't try to do a photo shoot with kids and dogs around, hire a professional photographer, and lose that last 10 pounds!

What do you think? I think the next time I wear this dress I will wear it with a belt. You can see a close up of the neckline here.

Up next: Simplicity 2443, View A